
Again, the value of Elements is that you can download as many files as you want while you're a subscriber. And if you stop subscribing, you'll still have the right to use the creative assets you grabbed. It's much faster than building every slide from scratch.
If you want to follow along, download the beautiful Agio PowerPoint template from Envato Elements.
Discover simple PowerPoint template designs with powerful features on Envato Elements or GraphicRiver. The right premium PPT template will help you make a great presentation quickly.
Envato Elements includes hundreds of PowerPoint themes as part of its all-you-can-download flat rate service.
2. Add Your Own Text

No Microsoft PowerPoint tutorial would be complete without customizing fonts. Sometimes, it’s easy to overlook text as a design element, but with a few quick edits you can make your words really stand out.
There's no practical limit to the number of slides that your PowerPoint file can contain. But you should consider how many slides it actually takes to make your point. It's often the
PowerPoint is no exception to this rule. It's especially important that you can cut to the chase when you're rushing to prepare for your presentation.
Now that you understand the layout, you've got a better idea of how you can jump to the feature you need. Let's dive a bit deeper into how you can use several of these key tabs.
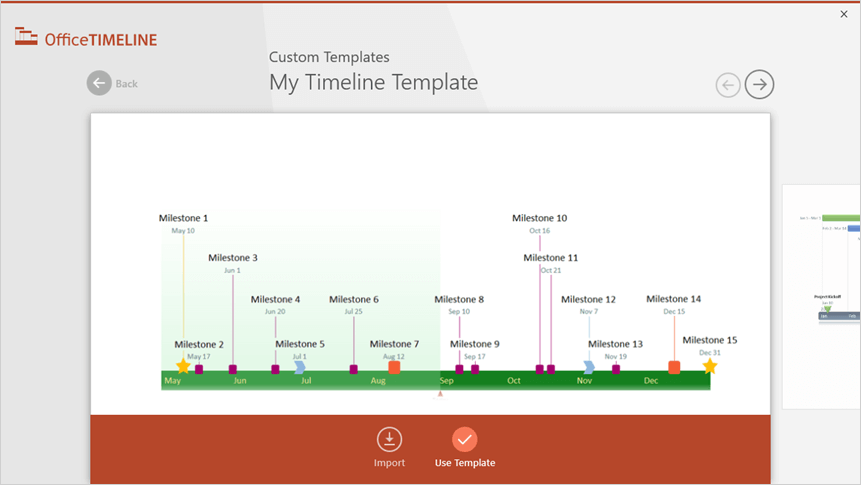
Create a new presentation or open an existing one and add a new blank slide.
This will open a gallery that provides a variety of styles and templates you can choose from for your timeline.
If the Text Pane is not already visible, click on the small icon right on the left of your timeline arrow to open it.
For those who need to regularly create and update timeline slides for high-level presentations, a simple and fast solution would be to use a PowerPoint add-in that automates the process. On this page, you will see both the manual and the automatic way to make a timeline in PowerPoint.
Which tutorial would you like to see?
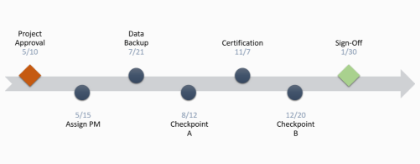
You may be tempted to manually increase the texts’ sizes for improved legibility. I’d suggest avoiding that because it tends to ruin the whole layout. Instead, you can expand the size of the graphic box as I did above, and PowerPoint will automatically make the milestone descriptions larger too.
To add more milestones, simply press Enter after an existing item in the Text Pane and insert your data. You’ll notice that PowerPoint automatically shrinks the texts’ size the more events you add to your timeline. To ensure your data remains easy to read, it would be safe to keep to maximum 5 or 7 milestones.
The initial graphic generated by PowerPoint will have placeholder text and only 3 milestones. You can insert your own data directly on the graphic by typing inside the [Text] boxes on the slide, but adding new milestones or events besides the 3 default ones can become a little tricky this way. That’s why I’d recommend using the Text Pane instead, as it’s faster and it allows you to easily insert extra milestones on your timeline. Here’s how it works:
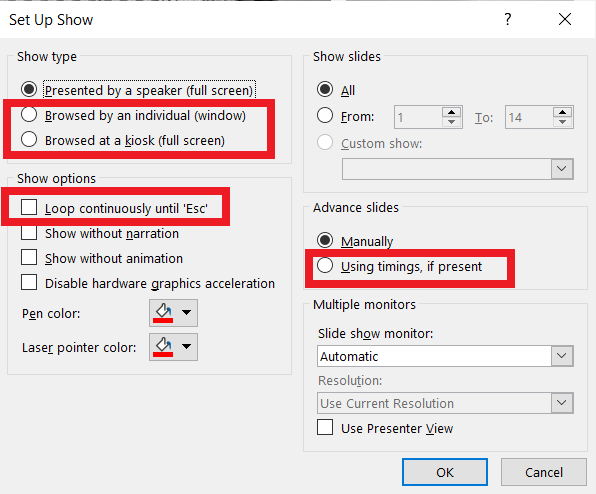
Using the PowerPoint autoplay feature is very easy. It also offers a wide array of options for a self-running slideshow. You can add personalized timings, add narrations and recordings, and in short, allow you to totally forget about manually advancing your slides.
If you’re not sure what option is the best for you, remember you can always select manually the loop and timings option. Try different options with these and try out how your presentation will look like with the different settings.
Manually add how much time you want to spend on each of your slides at the After option.
Make sure to select the Apply To All option so all your slides have the same timing. This is what will create regular intervals for your self-running PowerPoint slideshow.
OPTION 1: How to make a PowerPoint play automatically

Select the Record Slide Show option for working on this. You can also customize if you want to add a recording of yourself with your camera or just your voice. You can even add pen commentary and highlight specific elements. It’ll be just like if you were right there with your viewers!
Self-running PowerPoint slideshows can sometimes get confused with looping presentations. But they are not mutually exclusive. In fact, they work perfectly together! An automatic PowerPoint slideshow is a presentation where you don’t need to click to advance to the next slide. A looping PowerPoint presentation is one that once it gets to the final slide, starts all over again from the beginning.
After you’re finished going through all your slides, a message will pop up to save your timings. You can save it and keep rehearsing with your self-running PowerPoint.
:max_bytes(150000):strip_icc()/PP_VO_12-be873f4a2ddc4465ae73f5a139076ae4.jpg)
To delete the voiceover from all the slides in a presentation: Select Slide Show and then select the down arrow to open the Record Slide Show menu. Then, select Clear Narration on All Slides.
Once you’ve recorded your narration, you can go back to the slides and listen to your voiceover.
When you’re done recording your narration on the slide, select Stop and close the recording window to return to the presentation.
In PowerPoint 2016 and earlier versions, a Record Slide Show dialog box prompts you for further options. In the Record Slide Show box, select options to set up the slideshow:
How to Delete a Voiceover
:max_bytes(150000):strip_icc()/PP_VO_09-4e3c7d244cdf4d40a130a63aa25c9612.jpg)
- Slide and animation timings: When recording, PowerPoint automatically tracks the timing of slide changes and any animations that occur.
- Narrations, ink, and laser pointer: When recording, PowerPoint automatically tracks when narrations, any inking, or laser pointing occurs.
The voiceover for the entire presentation can be recorded at one time. In addition to recording a voiceover, you can record a video of yourself giving your presentation.
Select Slide Show > Record Slide Show > Record from Current Slide.
You may have noticed some controls at the bottom left side of the screen. These are a few controls to aid you in your presentation.

Viewers will put up with rough visuals, but they won’t forgive poor sound.
Anything you type in the notes section of the PowerPoint can be viewed by clicking on the notes button at the top.
If you’d like to sit back and learn, check out this video we created on how to easily add voiceover to your slides:
Microsoft Powerpoint has a feature that many average users don’t know about, which allows you to add voice-over narration to your slides.
Option 1. How to do voice over PowerPoint

This may be easy for a simple presentation but could prove frustrating for a longer presentation – the inability to edit means you’ve got one shot to make it through your presentation without any mistakes.
You may want to use PowerPoint or Google Slides to add voice over to each slide that plays as students make their way through the presentation. PowerPoint has recording functionality built-in, but with Google Slides there are extra steps involved with recording your audio, then uploading it to google drive before you can embed on each slide.
If you’re on a Mac, you can make a video recording of the entire screen or just a portion of it. Shift-Command(⌘)-5 will display onscreen controls for recording the entire screen .